mysql使用心得(六)—-cluster
官方网站
http://dev.mysql.com/downloads/cluster/
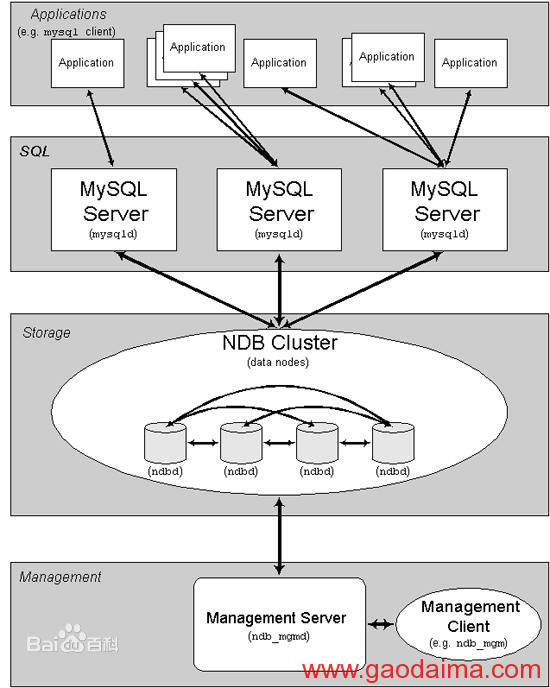
mysql-cluster其实就是mysql7.0版本的别名。但是根据个人经验,在实际生产中,很少有人用。所以这里写个文章,作为入门的了解和学习。
cluster的安装,首先要安装java和cmake
datadir=/data0/search/mysql-cluster
【安装管理节点】
cmake -DCMAKE_INSTALL_PREFIX=/application/search/mysql-cluster/mysql-cluster-gpl-7.2.8
make -j16
make install -j16
复制配置文件,并修改相应配置
mkdir etc
cp support-files/config.huge.ini etc/
启动
./ndb_mgmd –config-file=/application/search/mysql-cluster/mysql-cluster-gpl-7.2.8/etc/config.ini
修改配置重启–reload
./ndb_mgmd –config-file=/application/search/mysql-cluster/mysql-cluster-gpl-7.2.8/etc/config.ini –reload
登录管理客户端
./ndb_mgm
停止
./ndb_mgm -e shutdown
重启其他节点 <id> restart -f;
查看表分区情况
在config.ini必须预留一个空的引擎节点
[API]
Id: 6
> show #看最后一行,否则无法查看表分区情况
Cluster Configuration
———————
[ndbd(NDB)] 3 node(s)
id=2 @10.10.128.118 (mysql-5.5.27 ndb-7.2.8, Nodegroup: 0, Master)
id=3 @10.10.128.117 (mysql-5.5.27 ndb-7.2.8, Nodegroup: 1)
id=5 @10.10.128.119 (mysql-5.5.27 ndb-7.2.8, Nodegroup: 2)
[ndb_mgmd(MGM)] 1 node(s)
id=1 @10.10.128.119 (mysql-5.5.27 ndb-7.2.8)
[mysqld(API)] 2 node(s)
id=4 @10.10.128.116 (mysql-5.5.27 ndb-7.2.8)
id=6 (not connected, accepting connect from any host)
查看命令
./ndb_desc user -d opendata_test -p
【安装数据节点】
./scripts/mysql_install_db –user=search –datadir=/data0/search/mysql-cluster
创建配置文件/application/search/mysql-cluster/mysql-cluster-gpl-7.2.8/etc/ndb.ini
[mysqld]
datadir=/data0/search/mysql-cluster
skip-locking
ndbcluster
ndb-connectstring=10.10.128.119:1186
[mysql_cluster]
ndb-connectstring=10.10.128.119:1186
启动数据节点 ,第一次启动必须带上–initial
./ndbd –defaults-file=/application/search/mysql-cluster/mysql-cluster-gpl-7.2.8/etc/ndb.ini –initial
【安装mysql引擎】
创建配置文件/application/search/mysql-cluster/mysql-cluster-gpl-7.2.8/etc/ndb.ini
并加入
[mysqld]
# ndb
ndbcluster
ndb-connectstring=10.10.128.119:1186
初始化
./scripts/mysql_install_db –user=search –datadir=/data0/search/mysql-cluster
启动
./mysqld -uroot &
SELECT TABLE_SCHEMA, TABLE_NAME FROM INFORMATION_SCHEMA.TABLES WHERE ENGINE = ‘NDBCLUSTER’;
ALTER ONLINE TABLE table_name REORGANIZE PARTITION
【创建磁盘表】
创建日志文件
CREATE LOGFILE GROUP lg_cloudstor ADD UNDOFILE ‘cloudstor_undo_1.log’ INITIAL_SIZE 1024M UNDO_BUFFER_SIZE 20M ENGINE NDBCLUSTER;
该语句可能会出错,出现ERROR 1064 (42000)语法错误的信息,原因是字符集的问题,先执行:set character_set_client=latin1; 在执行:
ALTER LOGFILE GROUP lg_cloudstor ADD UNDOFILE ‘cloudstor_undo_2.log’ INITIAL_SIZE 1024M ENGINE NDBCLUSTER;
ALTER LOGFILE GROUP lg_cloudstor ADD UNDOFILE ‘cloudstor_undo_3.log’ INITIAL_SIZE 1024M ENGINE NDBCLUSTER;
创建表空间
CREATE TABLESPACE ts_cloudstore ADD DATAFILE ‘cloudstore_data_1.dbf’ USE LOGFILE GROUP lg_cloudstor INITIAL_SIZE 1024M AUTOEXTEND_SIZE 256M ENGINE NDBCLUSTER;
ALTER TABLESPACE ts_cloudstore ADD DATAFILE ‘cloudstore_data_2.dbf’ INITIAL_SIZE 1024M AUTOEXTEND_SIZE 256M ENGINE NDBCLUSTER;
创建表
create table disktable( /
id int auto_increment primary key, /
c1 varchar(50) not null, /
c2 varchar(30) default null, /
c3 date default null, /
index(c1))TABLESPACE ts_cloudstore STORAGE DISK ENGINE=ndbcluster
删除
drop table disktable;
alter tablespace ts_cloudstore drop datafile ‘cloudstore_data_1.dbf’ engine ndbcluster;
alter tablespace ts_cloudstore drop datafile ‘cloudstore_data_2.dbf’ engine ndbcluster;
drop tablespace ts_cloudstore engine ndbcluster;
drop logfile group lg_cloudstor engine ndbcluster;


