用Jersey构建RESTful服务5–Jersey+mysql5.6+Hibernate4.3
一、总体说明
本例运行演示了用Jersey构建RESTful服务中,如何同过Hibernate将数据持久化进MySQL的过程
二、环境
1.上文的项目RestDemo
2.MySQL5.6下载http://dev.mysql.com/get/Downloads/MySQL-5.6/mysql-5.6.16-win32.zip
3.Hibernate4.3.4下载http://sourceforge.net/projects/hibernate/files/hibernate4/4.3.4.Final/hibernate-release-4.3.4.Final.zip
4.java程序连接MySQL的驱动mysql-connector-java-5.1.29-bin.jar下载
http://dev.mysql.com/get/Downloads/Connector-J/mysql-connector-java-5.1.29.zip
三、数据库准备
1.搭建MySQL数据库
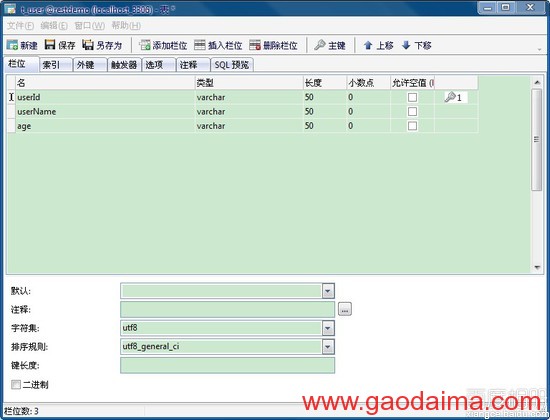
2.创建数据库RestDemo ,及数据表t_user,结构如下
DROP TABLE IF EXISTS `t_user`;
CREATE TABLE `t_user` (
`userId` varchar(50) NOT NULL,
`userName` varchar(50) NOT NULL,
`age` varchar(50) NOT NULL,
PRIMARY KEY (`userId`)
) ENGINE=InnoDB DEFAULT CHARSET=utf8;

ps: userId 非自增长类型,需要在业务添加
四、引入Hibernate
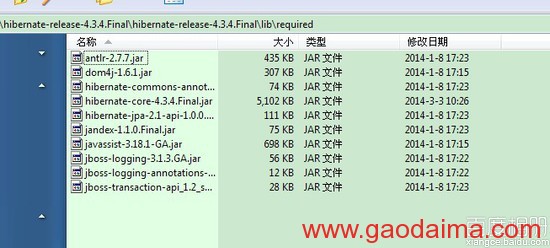
1.解压Hibernate的包,在lib/required文件夹下所有jar引入进项目

2.解压mysql-connector-java-5.1.29.zip,将mysql-connector-java-5.1.29-bin.jar引入进项目
3.在项目的根目录创建hibernate的配置文件hibernate.cfg.xml,内容如下:
<?xml version='1.0' encoding='utf-8'?> <!DOCTYPE hibernate-configuration PUBLIC "-//Hibernate/Hibernate Configuration DTD 3.0//EN" "http://www.hibernate.org/dtd/hibernate-configuration-3.0.dtd"> <hibernate-configuration> <session-factory> <!-- Database connection settings --> <property name="connection.driver_class">com.mysql.jdbc.Driver</property> <property name="connection.url">jdbc:mysql://127.0.0.1:3306/RestDemo</property> <property name="connection.username">root</property> <property name="connection.password"></property> <!-- JDBC connection pool (use the built-in) --> <property name="connection.pool_size">1</property> <!-- SQL dialect --> <property name="dialect">org.hibernate.dialect.MySQLDialect</property> <!-- Enable Hibernate's automatic session context management --> <property name="current_session_context_class">thread</property> <!-- Disable the second-level cache --> <property name="cache.provider_class">org.hibernate.cache.internal.NoCacheProvider</property> <!-- Echo all executed SQL to stdout --> <property name="show_sql">true</property> <!-- Drop and re-create the database schema on startup --> <property name="hbm2ddl.auto">update</property> <mapping resource="com/waylau/rest/bean/User.hbm.xml"/> </session-factory> </hibernate-configuration>
欢迎大家阅读《用Jersey构建RESTful服务5-Jersey+MySQL5.6+Hibernate4.3》,跪求各位点评,by 搞代码
4.在项目User.java 的同个目录下,创建该类的映射文件User.hbm.xml
<?xml version="1.0"?> <!DOCTYPE hibernate-mapping PUBLIC "-//Hibernate/Hibernate Mapping DTD 3.0//EN" "http://www.hibernate.org/dtd/hibernate-mapping-3.0.dtd"> <hibernate-mapping package="com.waylau.rest.bean"> <class name="User" table="T_USER"> <id name="userId" column="USERID" type="string" > <generator class="assigned"/> </id> <property name="userName" type="string" /> <property name="age" type="string" /> </class> </hibernate-mapping>
5.创建包com.waylau.rest.util,在该包下创建HibernateUtil.java
package com.waylau.rest.util; import org.hibernate.SessionFactory; import org.hibernate.boot.registry.StandardServiceRegistry; import org.hibernate.boot.registry.StandardServiceRegistryBuilder; import org.hibernate.cfg.Configuration; /** * Hibernate 初始化配置工具类 * @author waylau.com * 2014-3-23 */ public class HibernateUtil { private static Configuration configuration; private static SessionFactory sessionFactory; private static StandardServiceRegistry standardServiceRegistry; static { try { //第一步:读取Hibernate的配置文件 hibernamte.cfg.xml文件 configuration = new Configuration().configure("hibernate.cfg.xml"); //第二步:创建服务注册构建器对象,通过配置对象中加载所有的配置信息 StandardServiceRegistryBuilder sb = new StandardServiceRegistryBuilder(); sb.applySettings(configuration.getProperties()); //创建注册服务 standardServiceRegistry = sb.build(); //第三步:创建会话工厂 sessionFactory = configuration.buildSessionFactory(standardServiceRegistry); } catch (Throwable ex) { // Make sure you log the exception, as it might be swallowed System.err.println("Initial SessionFactory creation failed." + ex); throw new ExceptionInInitializerError(ex); } } public static SessionFactory getSessionFactory() { return sessionFactory; } }
6.在项目中建com.waylau.rest.dao包,在该包下建立User操作的接口UserDao.java
package com.waylau.rest.dao; import java.util.List; import com.waylau.rest.bean.User; /** * User Dao 接口 * @author waylau.com * 2014-3-18 */ public interface UserDao { public User getUserById(String id); public boolean deleteUserById(String id); public boolean createUser(User user); public boolean updateUser(User user); public List<User> getAllUsers(); }
7.在项目中建com.waylau.rest.dao.impl包,在该包下建立User操作接口的实现UserDaoImpl.java
package com.waylau.rest.dao.impl; import java.util.List; import org.hibernate.Query; import org.hibernate.Session; import org.hibernate.SessionFactory; import org.hibernate.Transaction; import com.waylau.rest.bean.User; import com.waylau.rest.dao.UserDao; import com.waylau.rest.util.HibernateUtil; /** * 用户DAO实现 * @author waylau.com * 2014-3-23 */ public class UserDaoImpl implements UserDao { @Override public User getUserById(String id) { SessionFactory sessionFactory = HibernateUtil.getSessionFactory(); Session s = null; Transaction t = null; User user = null; try{ s = sessionFactory.openSession(); t = s.beginTransaction(); String hql = "from User where userId="+id; Query query = s.createQuery(hql); user = (User) query.uniqueResult(); t.commit(); }catch(Exception err){ t.rollback(); err.printStackTrace(); }finally{ s.close(); } return user; } @Override public boolean deleteUserById(String id) { SessionFactory sessionFactory = HibernateUtil.getSessionFactory(); Session s = null; Transaction t = null; boolean flag = false; try{ s = sessionFactory.openSession(); t = s.beginTransaction(); User user = new User(); user.setUserId(id); s.delete(user); t.commit(); flag = true; }catch(Exception err){ t.rollback(); err.printStackTrace(); }finally{ s.close(); } return flag; } @Override public boolean createUser(User user) { SessionFactory sessionFactory = HibernateUtil.getSessionFactory(); Session s = null; Transaction t = null; boolean flag = false; try{ s = sessionFactory.openSession(); t = s.beginTransaction(); s.save(user); t.commit(); flag = true; }catch(Exception err){ t.rollback(); err.printStackTrace(); }finally{ s.close(); } return flag; } @Override public boolean updateUser(User user) { SessionFactory sessionFactory = HibernateUtil.getSessionFactory(); Session s = null; Transaction t = null; boolean flag = false; try{ s = sessionFactory.openSession(); t = s.beginTransaction(); s.update(user); t.commit(); flag = true; }catch(Exception err){ t.rollback(); err.printStackTrace(); }finally{ s.close(); } return flag; } @Override public List<User> getAllUsers() { SessionFactory sessionFactory = HibernateUtil.getSessionFactory(); Session s = null; Transaction t = null; List<User> uesrs = null; try{ s = sessionFactory.openSession(); t = s.beginTransaction(); String hql = "select * from t_user"; Query query = s.createSQLQuery(hql).addEntity(User.class); query.setCacheable(true); // 设置缓存 uesrs = query.list(); t.commit(); }catch(Exception err){ t.rollback(); err.printStackTrace(); }finally{ s.close(); } return uesrs; } }
8.修改项目中 com.waylau.rest.resources包下的UserResource.java,使之前在内存中模拟CURD转为在数据库中实现
package com.waylau.rest.resources; import java.util.ArrayList; import java.util.List; import javax.ws.rs.Path; import javax.ws.rs.Produces; import javax.ws.rs.Consumes; import javax.ws.rs.PathParam; import javax.ws.rs.core.MediaType; import javax.ws.rs.DELETE; import javax.ws.rs.GET; import javax.ws.rs.POST; import javax.ws.rs.PUT; import com.waylau.rest.bean.User; import com.waylau.rest.dao.impl.UserDaoImpl; /** * 用户资源 * @author waylau.com * 2014-3-19 */ @Path("/users") public class UserResource { private UserDaoImpl userDaoImpl = new UserDaoImpl(); /** * 增加 * @param user */ @POST @Consumes({MediaType.APPLICATION_XML, MediaType.APPLICATION_JSON}) public void createUser(User user) { userDaoImpl.createUser(user); } /** * 删除 * @param id */ @DELETE @Path("{id}") public void deleteUser(@PathParam("id")String id){ userDaoImpl.deleteUserById(id); } /** * 修改 * @param user */ @PUT @Consumes(MediaType.APPLICATION_XML) public void updateUser(User user){ userDaoImpl.updateUser(user); } /** * 根据id查询 * @param id * @return */ @GET @Path("{id}") @Produces({MediaType.APPLICATION_XML, MediaType.APPLICATION_JSON}) public User getUserById(@PathParam("id") String id){ User u = userDaoImpl.getUserById(id); return u; } /** * 查询所有 * @return */ @GET @Produces({MediaType.APPLICATION_XML, MediaType.APPLICATION_JSON}) public List<User> getAllUsers(){ List<User> users = new ArrayList<User>(); users = userDaoImpl.getAllUsers(); return users; } }
五、运行
1.将服务端运行后
2.运行UserClient客户端,可以看到数据库已经实现增删改查
完整项目架构如下:


