Android开发从入门到精通
章节三 : 布局
Android中有六大布局,别离是:
- LinearLayout(线性布局)
- RelativeLayout(绝对布局)
- TableLayout(表格布局)
- FrameLayout(帧布局)
- AbsoluteLayout(相对布局)
- GridLayout(网格布局)
LinearLayout(线性布局),咱们屏幕适配的应用 用的比拟多的就是LinearLayout的weight(权重属性), LinearLayout,包含一些根本的属性,Weight属性的应用,以及比例如何计算,另外还 会说下一个用的比拟少的属性:android:divider绘制下划线!
LinearLayout属性概览
2、weight(权重)属性详解
代码示例
<LinearLayout xmlns:android="http://schemas.android.com/apk/res/android"
xmlns:tools="http://schemas.android.com/tools"
android:id="@+id/LinearLayout1"
android:layout_width="match_parent"
android:layout_height="match_parent"
android:orientation="horizontal">
<LinearLayout
android:layout_width="0dp"
android:layout_height="fill_parent"
android:background="#ADFF2F"
android:layout_weight="1" />
<LinearLayout
android:layout_width="0dp"
android:layout_height="fill_parent"
android:background="#DA70D6"
android:layout_weight="2"/>
</LinearLayout>
代码中的
<font color=Red>
android:layout_weight="1"
</font>
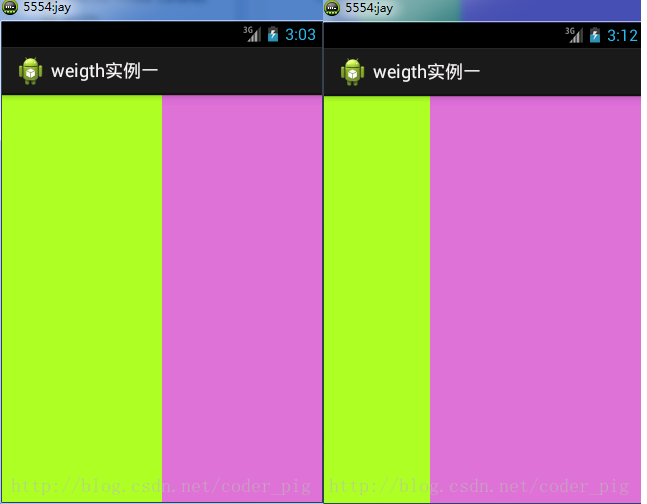
即为权重,波及到屏幕比例调配 两个weight都为1时为右边效果图,效果图左边即为上述代码
<font color=Red size=4>
波及到须要计算的权重,分为两种状况,wrap_content与match_parent的长宽设置,另外还要看 LinearLayout的orientation是程度还是竖直,这个决定哪个方向等比例划分
</font>
依照wrap_content来划分,成果如下
<LinearLayout xmlns:android="http://schemas.android.com/apk/res/android"
    xmlns:tools="http://schemas.android.com/tools"
    android:id="@+id/LinearLayout1"
    android:layout_width="match_parent"
    android:layout_height="match_parent"
    android:orientation="horizontal" >

    <TextView
        android:layout_weight="1"
        android:layout_width="wrap_content"
        android:layout_height="fill_parent"
        android:text="one"
        android:background="#98FB98"/>
     <TextView
        android:layout_weight="2"
        android:layout_width="wrap_content"
        android:layout_height="fill_parent"
        android:text="two"
        android:background="#FFFF00"/>
     <TextView
        android:layout_weight="3"
        android:layout_width="wrap_content"
        android:layout_height="fill_parent"
        android:text="three"
        android:background="#FF00FF"/>

</LinearLayout>
依照match_parent来划分,成果如下
<LinearLayout xmlns:android="http://schemas.android.com/apk/res/android"
    xmlns:tools="http://schemas.android.com/tools"
    android:id="@+id/LinearLayout1"
    android:layout_width="match_parent"
    android:layout_height="match_parent"
    android:orientation="horizontal" >

    <TextView
        android:layout_weight="1"
        android:layout_width="wrap_content"
        android:layout_height="fill_parent"
        android:text="one"
        android:background="#98FB98"/>
     <TextView
        android:layout_weight="2"
        android:layout_width="wrap_content"
        android:layout_height="fill_parent"
        android:text="two"
        android:background="#FFFF00"/>
     <TextView
        android:layout_weight="3"
        android:layout_width="wrap_content"
        android:layout_height="fill_parent"
        android:text="three"
        android:background="#FF00FF"/>

</LinearLayout>
<font color=red Size=4>
这个时候就会有疑难了,怎么会这样?比例是2:1吧,那么three去哪了?代码外面明明有 three的啊,还设置了3的,而1和2的比例也不对耶,1:2:3却变成了2:1:0,怎么会这样呢?
</font>
<font color=green Size=4>
答:这里其实没那么简略的,还是须要咱们计算的,网上给出的算法有几种,这里就给出笔者 感觉比拟容易了解的一种: step 1:个个都是fill_parent,然而屏幕只有一个啦,那么1 – 3 = – 2 fill_parent step 2:顺次比例是1/6,2/6,3/6 step 3:先到先得,先分给one,计算: 1 – 2 (1/6) = 2/3 fill_parent 接着到two,计算: 1 – 2 (2/6) = 1/3 fill_parent 最初到three,计算 1 – 2 * (3/6) = 0 fill_parent step 4:所以最初的后果是:one占了两份,two占了一份,three什么都木有 以上就是为什么three没有呈现的起因了!
</font>
Divider属性
LinearLayout的一个divider属性,间接为LinearLayout设置分割线 这里就须要你本人筹备一张线的图片了
- 1)android:divider设置作为分割线的图片
- 2)android:showDividers设置分割线的地位,none(无),beginning(开始),end(完结),middle(每两个组件间)
- 3)dividerPadding设置分割线的Padding
<LinearLayout xmlns:android="http://schemas.android.com/apk/res/android"
    xmlns:tools="http://schemas.android.com/tools"
    android:id="@+id/LinearLayout1"
    android:layout_width="match_parent"
    android:layout_height="match_parent"
    android:divider="@drawable/ktv_line_div"
    android:orientation="vertical"
    android:showDividers="middle"
    android:dividerPadding="10dp"
    tools:context="com.jay.example.linearlayoutdemo.MainActivity" >

    <Button
        android:layout_width="wrap_content"
        android:layout_height="wrap_content"
        android:text="按钮1" />

    <Button
        android:layout_width="wrap_content"
        android:layout_height="wrap_content"
        android:text="按钮2" />

    <Button
        android:layout_width="wrap_content"
        android:layout_height="wrap_content"
        android:text="按钮3" />

</LinearLayout>
注意事项:
应用Layout_gravity的一个很重要的问题!!!
问题内容: 在一个LinearLayout的程度方向中安排两个TextView,想让一个左,一个右,怎么做?
答:目前没有好的实现成果,如果要实现,能够应用RelativeLayout,布局还是倡议应用 RelativeLayout
RelativeLayout(绝对布局)
RelativeLayout的话,以父容器或者兄弟组件参考+margin +padding就能够设置组件的显示地位,是比拟不便的!当然,也不是相对的,具体问题具体分析!
总结:尽量应用RelativeLayout + LinearLayout的weight属性搭配应用!
RelativeLayout属性
父容器定位属性示意图
兄弟组件定位用意
margin与padding的区别
margin针对的是容器中的组件,而padding针对的是组件中的元素
演示效果图
示例代码:
<RelativeLayout xmlns:android="http://schemas.android.com/apk/res/android"
    xmlns:tools="http://schemas.android.com/tools"
    android:layout_width="match_parent"
    android:layout_height="match_parent"
    android:paddingBottom="@dimen/activity_vertical_margin"
    android:paddingLeft="@dimen/activity_horizontal_margin"
    android:paddingRight="@dimen/activity_horizontal_margin"
    android:paddingTop="@dimen/activity_vertical_margin"
    tools:context=".MainActivity" >

    <Button
        android:id="@+id/btn1"
        android:layout_height="wrap_content"
        android:layout_width="wrap_content"
        android:text="Button"/>
    <Button
        android:paddingLeft="100dp"
        android:layout_height="wrap_content"
        android:layout_width="wrap_content"
        android:text="Button"
        android:layout_toRightOf="@id/btn1"/>

    <Button
        android:id="@+id/btn2"
        android:layout_height="wrap_content"
        android:layout_width="wrap_content"
        android:text="Button"
        android:layout_alignParentBottom="true"/>
    <Button
        android:layout_marginLeft="100dp"
        android:layout_height="wrap_content"
        android:layout_width="wrap_content"
        android:text="Button"
        android:layout_toRightOf="@id/btn2"
        android:layout_alignParentBottom="true"/>

</RelativeLayout>
TableLayout(表格布局)
①如果咱们间接往TableLayout中增加组件的话,那么这个组件将占满一行
②如果咱们想一行上有多个组件的话,就要增加一个TableRow的容器,把组件都丢到外面
③tablerow中的组件个数就决定了该行有多少列,而列的宽度由该列中最宽的单元格决定
④tablerow的layout_width属性,默认是fill_parent的,咱们本人设置成其余的值也不会失效,然而layout_height默认是wrapten——content的,咱们却能够本人设置大小
⑤整个表格布局的宽度取决于父容器的宽度(占满父容器自身)
⑥有多少行就要本人数啦,一个tablerow一行,一个独自的组件也一行,多少列则是看tableRow中 的组件个数,组件最多的就是TableLayout的列数
三个罕用属性
android:collapseColumns:设置须要被暗藏的列的序号
android:shrinkColumns:设置容许被膨胀的列的列序号
android:stretchColumns:设置运行被拉伸的列的列序号
以上这三个属性的列号都是从0开始算的,比方shrinkColunmns = “2”,对应的是第三列!
能够设置多个,用逗号隔开比方”0,2″,如果是所有列都失效,则用”*”号即可
除了这三个罕用属性,还有两个属性,别离就是跳格子以及合并单元格,这和HTML中的Table相似:
android:layout_column=”2″:示意的就是跳过第二个,间接显示到第三个格子处,从1开始算的!
android:layout_span=”4″:示意合并4个单元格,也就说这个组件占4个单元格
小结:
TableLayout 大抵会波及到上诉五个属性的应用,理论开发 表格布局咱们用的不多,晓得简略的用法就能够了!
FrameLayout(帧布局)
FrameLayout(帧布局)能够说是六大布局中最为简略的一个布局,这个布局间接在屏幕上开拓出一块空白的区域,当咱们往里面增加控件的时候,会默认把他们放到这块区域的左上角,而这种布局形式却没有任何的定位形式,所以它利用的场景并不多;默认会将控件搁置在左上角, 也能够通过layout_gravity属性,指定到其余的地位
罕用属性
FrameLayout的属性很少就两个,然而在说之前咱们先介绍一个货色:
前景图像:永远处于帧布局最下面,间接面对用户的图像,就是不会被笼罩的图片。
两个属性:
android:foreground:*设置改帧布局容器的前景图像
android:foregroundGravity:设置前景图像显示的地位
GridLayout(网格布局)
该布局是Android 4.0当前引入的一个新的布局,和后面所学的TableLayout(表格布局) 有点相似,不过他有很多前者没有的货色,也更加好用,
- 反对自定义设置布局中组件的排列形式
- 反对自定义网格布局有多少行,多少列
- 反对间接设置组件位于某行某列
- 反对设置组件横跨几行或者几列
相干属性
留神的
咱们通过:android:layout_rowSpan与android:layout_columnSpan设置了组件横跨 多行或者多列的话,如果你要让组件填满横越过的行或列的话,须要增加上面这个属性: android:layout_gravity = “fill”
用法演绎:
①GridLayout应用虚细线将布局划分为行,列和单元格,同时也反对在行,列上进行交织排列 ②应用流程:
step 1:先定义组件的对其形式 android:orientation 程度或者竖直,设置多少行与多少列
step 2:设置组件所在的行或者列,记得是从0开始算的,不设置默认每个组件占一行一列
step 3:设置组件横跨几行或者几列;设置结束后,须要在设置一个填充:android:layout_gravity = “fill”
AbsoluteLayout(相对布局)
如章节题目所示,相对定位
1.四大管制属性(单位都是dp):
①管制大小: android:layout_width:组件宽度 android:layout_height:组件高度 ②管制地位: android:layout_x:设置组件的X坐标 android:layout_y:设置组件的Y坐标


